

Chicken Feeder Height by Age: A Practical Setup Guide
Feed is scattered across the shavings, the trough has a smear of droppings in it, and the smallest chick keeps getting pushed away from the pan. None of these problems looks serious in isolation, so feeder height often stays unchanged until wasted feed, dirty ration, or uneven growth becomes impossible to ignore.
The right setting isn't a universal measurement from the floor. Chicken feeder height is a working compromise between access, contamination, feeder geometry, and flock size. The practical starting point is usually the birds' back level, but the final setting should be validated by watching the smallest bird eat and measuring what ends up beneath the feeder.
Why Feeder Height Gets Ignored Until Something Goes Wrong
A feeder that works for a brooder can become a source of waste once the chicks start growing. Young birds reach a low tray easily, but scratching soon pushes bedding into the ration. Feed also gets flicked over the rim, while anything dropped onto damp litter becomes dirty quickly. Because the arrangement still appears usable, the height often stays unchanged.
Pullet growth exposes the problem more clearly. Birds do not mature at the same rate, and a feeder set for smaller chicks may force taller pullets to bend far into the pan. Raise it too soon, however, and the smaller birds may struggle to reach the feed. Watch the flock during a busy feeding period rather than judging the setting from the tallest bird alone.
Adult hens create a separate temptation. Their size makes almost any container seem accessible, so raising the feeder can look like an easy way to keep litter out. That adjustment may reduce floor contamination while making feeding harder for smaller breeds, younger birds, or subordinate hens. A bird that stretches, crouches, or waits for dominant hens to move has lost practical access.
Practical rule: Adjust the feeder for the problem you can observe. Decide whether the priority is reducing waste, keeping feed clean, or preserving access for the smallest bird, then verify that the adjustment does not create a larger problem.
Three clues from the coop floor
- Dry feed on clean litter points toward beak flicking, scratching, an unstable mount, or a pan with excessive room for feed movement. Raising the feeder may help only if the current height is contributing to the motion.
- Damp or dirty feed indicates a hygiene problem. Check wet bedding, manure, and the waterer before changing height. A correctly positioned rim cannot keep feed clean when the feeder sits beside a recurring source of moisture.
- A smaller bird waiting at the edge identifies an access problem. Lowering the feeder may restore access, while a cover or different feeder shape can address the waste that prompted a higher setting.
The Food and Agriculture Organization's poultry guidance connects a feed surface set approximately level with the birds' backs with less contamination and lower wastage. Its guidance also supports adjustable feeders, since bird size and litter depth change over time. Treat height as a setting to revisit after growth, bedding changes, and equipment changes.
The workable result is a feeder the shortest bird can use comfortably, with geometry and mounting that limit feed loss from taller birds. Measure and observe before choosing which problem to solve.
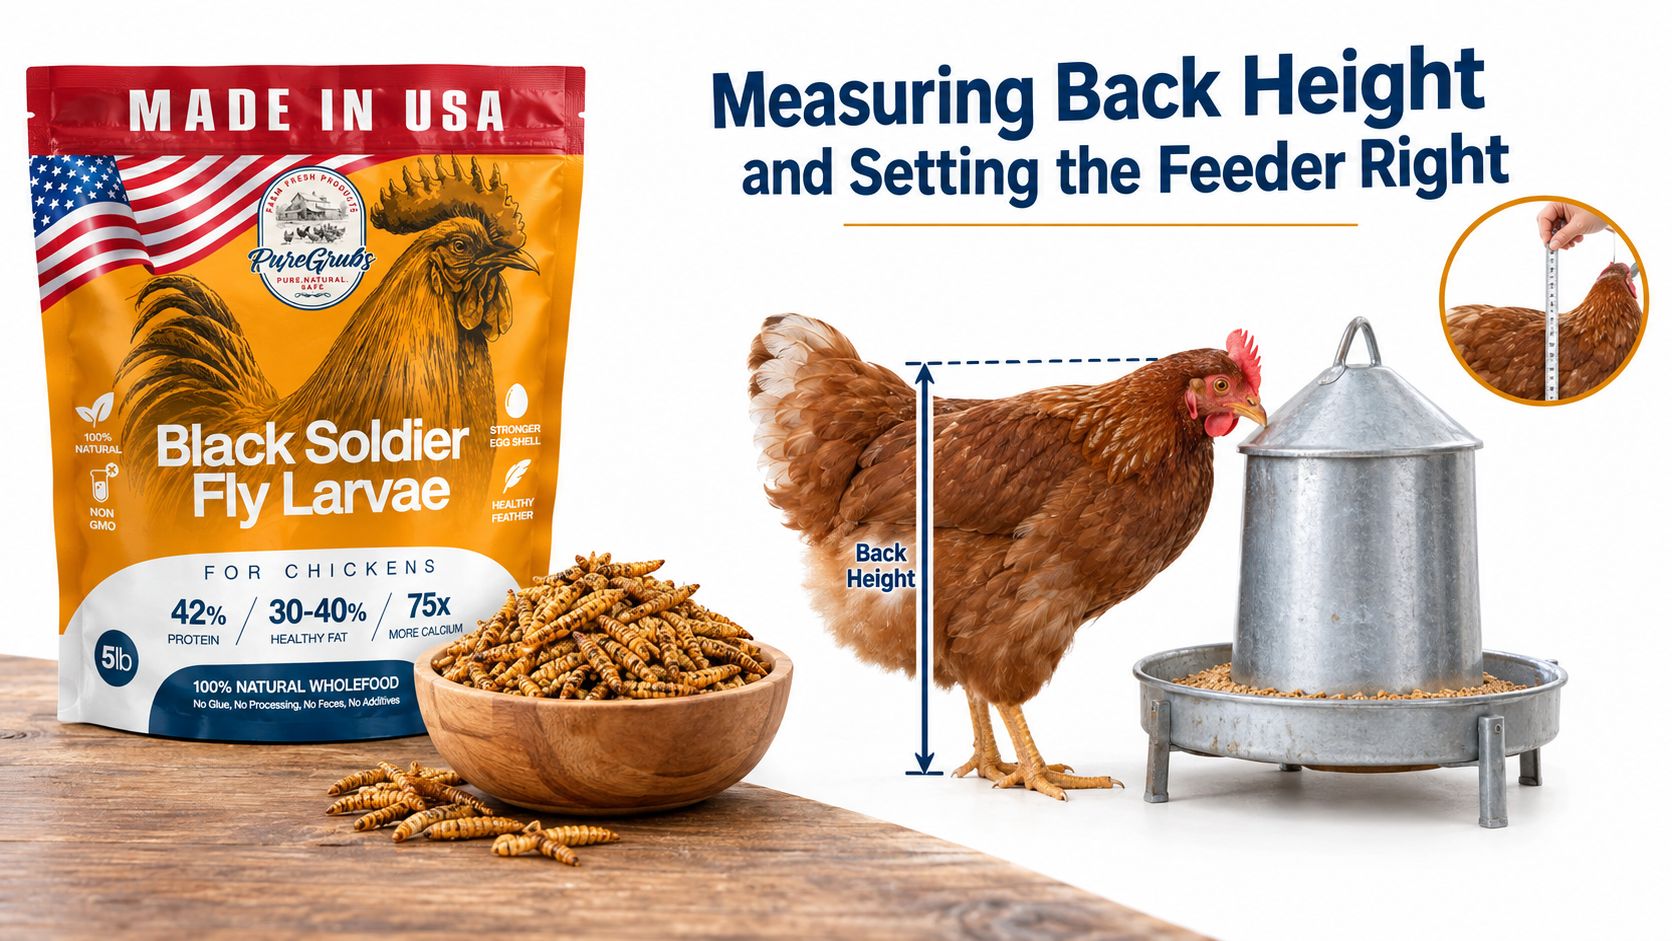
Measuring Back Height and Setting the Feeder Right
A feeder can be the right height on Monday and too low by Friday after fresh litter is added or a group of pullets grows noticeably. Measure from the birds and the litter surface, not from the coop floor or the feeder's packaging. Choose several representative birds, including the smallest bird that must eat from that feeder. Wait until each bird stands naturally with both feet on the litter, then measure to the top of the back.
The feed surface or usable lip should sit approximately level with the birds' backs. The part you align depends on the feeder's design. On a shallow trough, use the working feed edge. On a deep pan, assess the rim and the distance the beak must travel over it. A bird should not need to crouch, stand on tiptoe, or stretch its neck sharply upward to reach feed.
A repeatable adjustment routine
- Measure the smallest bird first. In a mixed flock, that bird sets the access limit. If taller hens can rake feed out at that position, address the feeder's cover, opening, or geometry before raising it beyond the smaller bird's comfortable reach.
- Use the litter surface as the reference. Account for the current bedding depth in your practical measurement. A feeder that was correctly positioned before fresh litter was added may now sit too low.
- Mark the support. Put tape on a hanging cord, or mark the bracket and wall behind a pan feeder. A visible reference makes it easier to restore the same setting after cleaning, moving, or replacing litter.
- Watch the feeding posture. Observe several birds during a busy feeding period. Smaller hens should eat without stretching, while taller birds should not need to bend sharply or sweep their beaks sideways to reach the feed.
- Change one variable at a time. Adjust the height in small increments, then check access and feed loss before changing the feed texture, location, or container.
Bird age changes the equipment setup as well as the birds' reach. Equipment guidance lists suggested feeder depths of 5 cm at 1–4 weeks, 8 cm at 4–6 weeks, 9 cm at 6–9 weeks, 12.5 cm at 10–14 weeks, and 15 cm after 15 weeks. These dimensions do not establish a universal hanging height, but they show why a brooder, grower pen, and laying flock should not be treated as one unchanged setup. Keep the feed itself no more than one-third of the container's depth. A deep, overfilled layer gives birds more opportunity to bill feed out of the container.
Feeder Height by Bird Age and Breed
| Life Stage | Bird Age | Large Fowl Height | Bantam Height |
|---|---|---|---|
| Young chicks | 1–4 weeks | Feed surface accessible at or near back level, with shallow equipment | Lower setting that preserves the same back-level access |
| Older chicks | 4–6 weeks | Recheck against the rising back and use equipment depth suited to this stage | Recheck more often because smaller birds have less reach |
| Growers | 6–9 weeks | Adjust the lip as the back rises; avoid forcing a crouched posture | Keep the lip reachable by the smallest bird |
| Pullets | 10–14 weeks | Maintain comfortable access while limiting beak-driven spillage | Set for the bantam bird, not the larger flock mate |
| Mature birds | After 15 weeks | Keep the working feed surface approximately level with the back | Use a separate lower setting if mixed with large fowl |
Breed size can make one flock difficult to set with a single position. The chicken size guide helps explain why large fowl and bantams may need separate feeding positions. Check the smallest bird after every height change, then inspect the floor beneath the feeder for fresh spillage.
A dedicated treat dish should follow the same bird-centered measurement. For example, USA GROWN BLACK SOLDIER FLY LARVAE FOR CHICKENS is described as USA-grown dried larvae with 36–42% crude protein, 30–40% healthy fats, and 75 times more calcium than mealworms. Those feed characteristics do not justify overfilling the main ration feeder or setting a treat dish where smaller birds cannot reach it.
How Feeder Style Changes the Height Rule
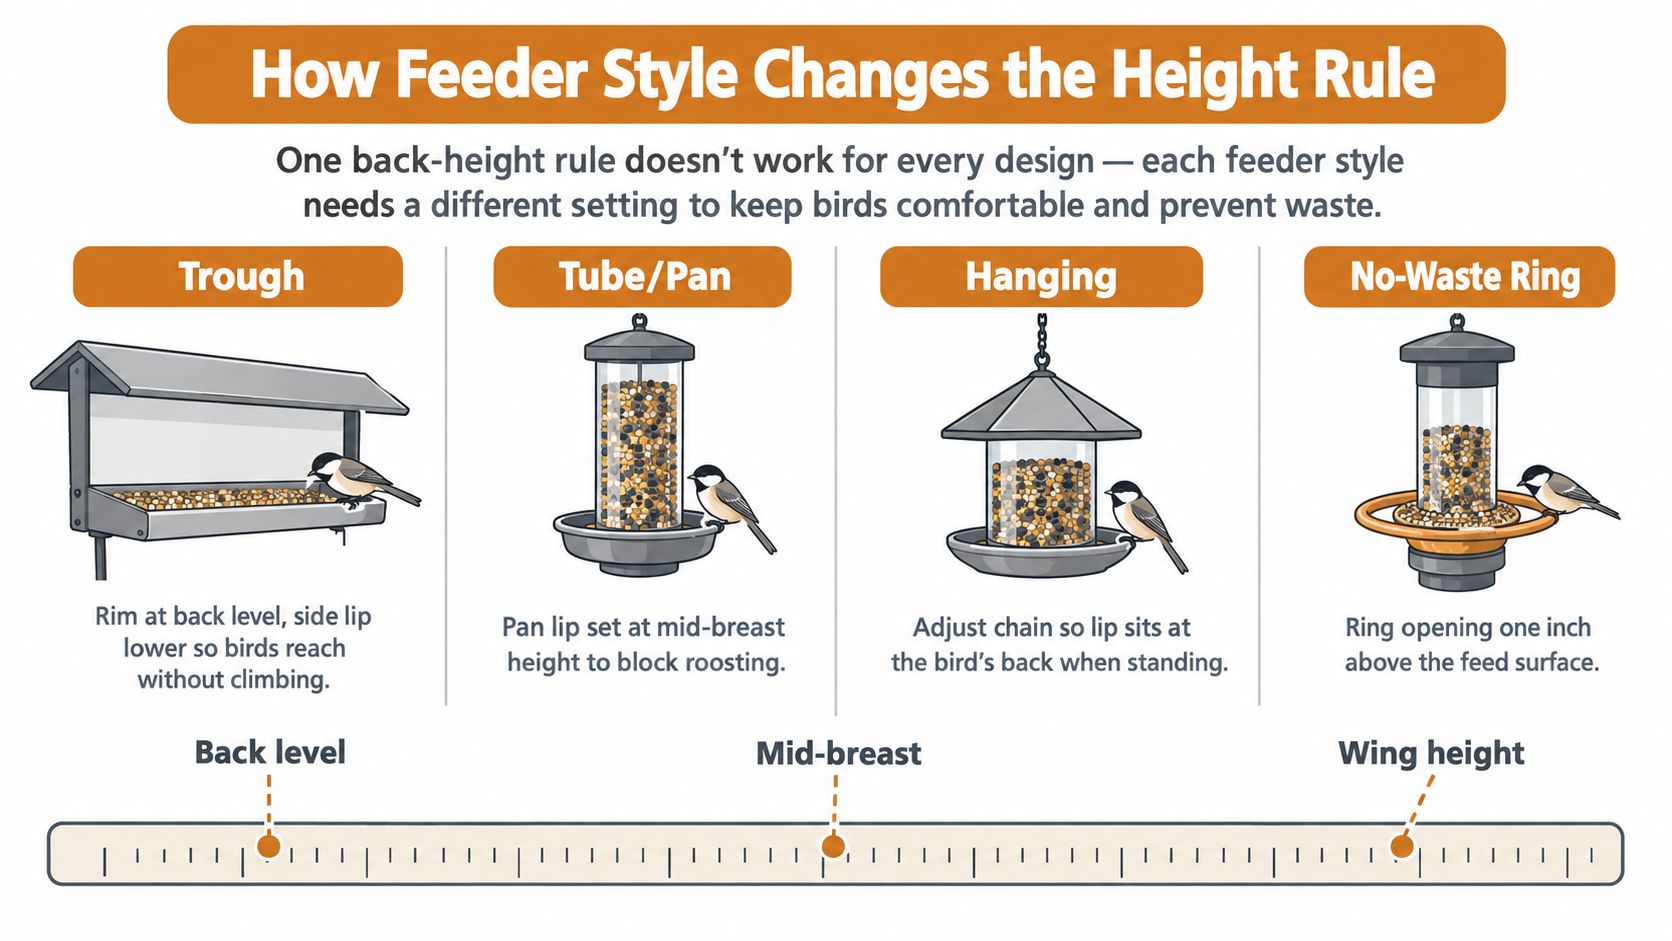
The same bird can need a different starting adjustment on a trough, pan, hanging feeder, or pipe design. The back-height principle still helps, but the point that matters is the bird's working reach, not an arbitrary distance from the ground.
A long, shallow trough exposes a broad feeding edge. Set its usable lip approximately level with the birds' backs, then watch whether birds can rake feed over the near side. A deeper pan requires more attention to the rim. If the bird has to reach down and over a tall edge, the pan may need a different position than a trough even when both are intended for the same flock.
Match the setting to the working edge
- Trough feeders need a stable support and a rim that doesn't sit down in bedding. Their open design makes feed texture and beak-scratching especially important.
- Hanging tube feeders can be adjusted by shortening or lengthening the cord. Keep the feeder level, and make sure the catch tray isn't sagging into litter on one side.
- Pan feeders often need a block or low platform. The support must be broad enough that birds can't tip the pan while feeding.
- PVC or pipe feeders have a narrow opening that changes the bird's effective reach. Judge the opening where the beak enters, not the top of the pipe or the mounting point.
Covered and enclosed designs may reduce flicking, but they don't remove the need to test access. The bird still determines whether the final position works. The feeder design comparison from Pure Grubs is useful when considering how openings, pans, and supports change the practical feeding position.
A feeder that swings is another common source of confusion. The static height may look correct, but every bump changes the bird's reach and can throw feed over the edge. Stabilize the support before raising the feeder further. Otherwise, you're treating movement as a height problem.
The most reliable sequence is simple: establish the working edge, place it near the smallest bird's back level, stabilize the container, and then watch the flock. If birds stretch, lower it. If tall birds sweep feed out or the rim collects litter, raise it slightly or improve the feeder's containment.
Balancing Waste, Contamination, and Bird Access
A feeder that leaves little waste can still fail if the smallest bird cannot reach it. Height solves one problem at a time. Raise the feeder to keep feed away from litter and droppings, reduce sideways beak movement, or stop birds from sweeping feed onto the floor. Then check whether every bird can still eat without stretching, crowding, or waiting.
Feeder space matters alongside height. Guidance for small-scale poultry systems sets minimum accessible space for both trough and circular feeders, because a well-positioned feeder still creates competition when too few birds can use it comfortably. If birds queue, shoulder one another aside, or avoid feeding until the area clears, adjust the layout or add another feeding point rather than raising the only feeder.
The Canadian scientific review on pullets and layers shows why access deserves direct observation. Hens with 8 or 10 cm of feeder space generally distributed themselves in proportion to the available feeding area, while the highest observed simultaneous occupancy was 59% at 12 cm per hen. The same review summarizes broiler evidence in which increasing feeder space from 2.3 cm to 4.6 or 6.9 cm per bird improved body weight during starter and grower phases, although later effects were less consistent. Height cannot make up for limited feeding room.
Three common placements
| Placement | Waste Risk | Contamination Risk | Best For |
|---|---|---|---|
| Floor-level tray | High when birds scratch or bill through feed | High when bedding, manure, or moisture enters | Very young chicks under close observation |
| Raised pan or trough | Moderate, depending on rim and feed depth | Lower when kept away from wet litter | Growers and adult flocks with stable access |
| Suspended or wall-mounted feeder | Low when stable and correctly adjusted | Lower than a floor feeder when birds do not perch | Uniform flocks and controlled feeding areas |
A brooder tray can remain low while chicks learn to eat, but inspect it often and replace feed when bedding gets inside. In a grow-out pen, use a broad, stable step so the feeder can rise with the birds without creating a difficult jump. In a laying coop, an adjustable support allows changes as backs rise and litter builds up.
Mixed-age flocks need a different solution. Set one feeder for the smallest bird, then add a second feeder elsewhere if larger birds create a queue. Do not solve contamination by making the only feeder inaccessible. The backyard meat chicken guidance from Poultry Extension pairs feeder access with raising the feeder to chicks' backs as they grow. Use the same approach in the coop: adjust for the problem, then watch the smallest bird eat normally.
If contamination increases, inspect the feed surface, litter, and feeder stability first. Raise the feeder only until the smallest bird still eats normally.
Running a Simple Waste Audit to Verify Your Height
Visual judgment is useful, but it can mislead. A clean-looking area may hide feed mixed into litter, while a large pile may include bedding rather than ration. A short before-and-after audit gives you a defensible answer about whether the adjustment helped.
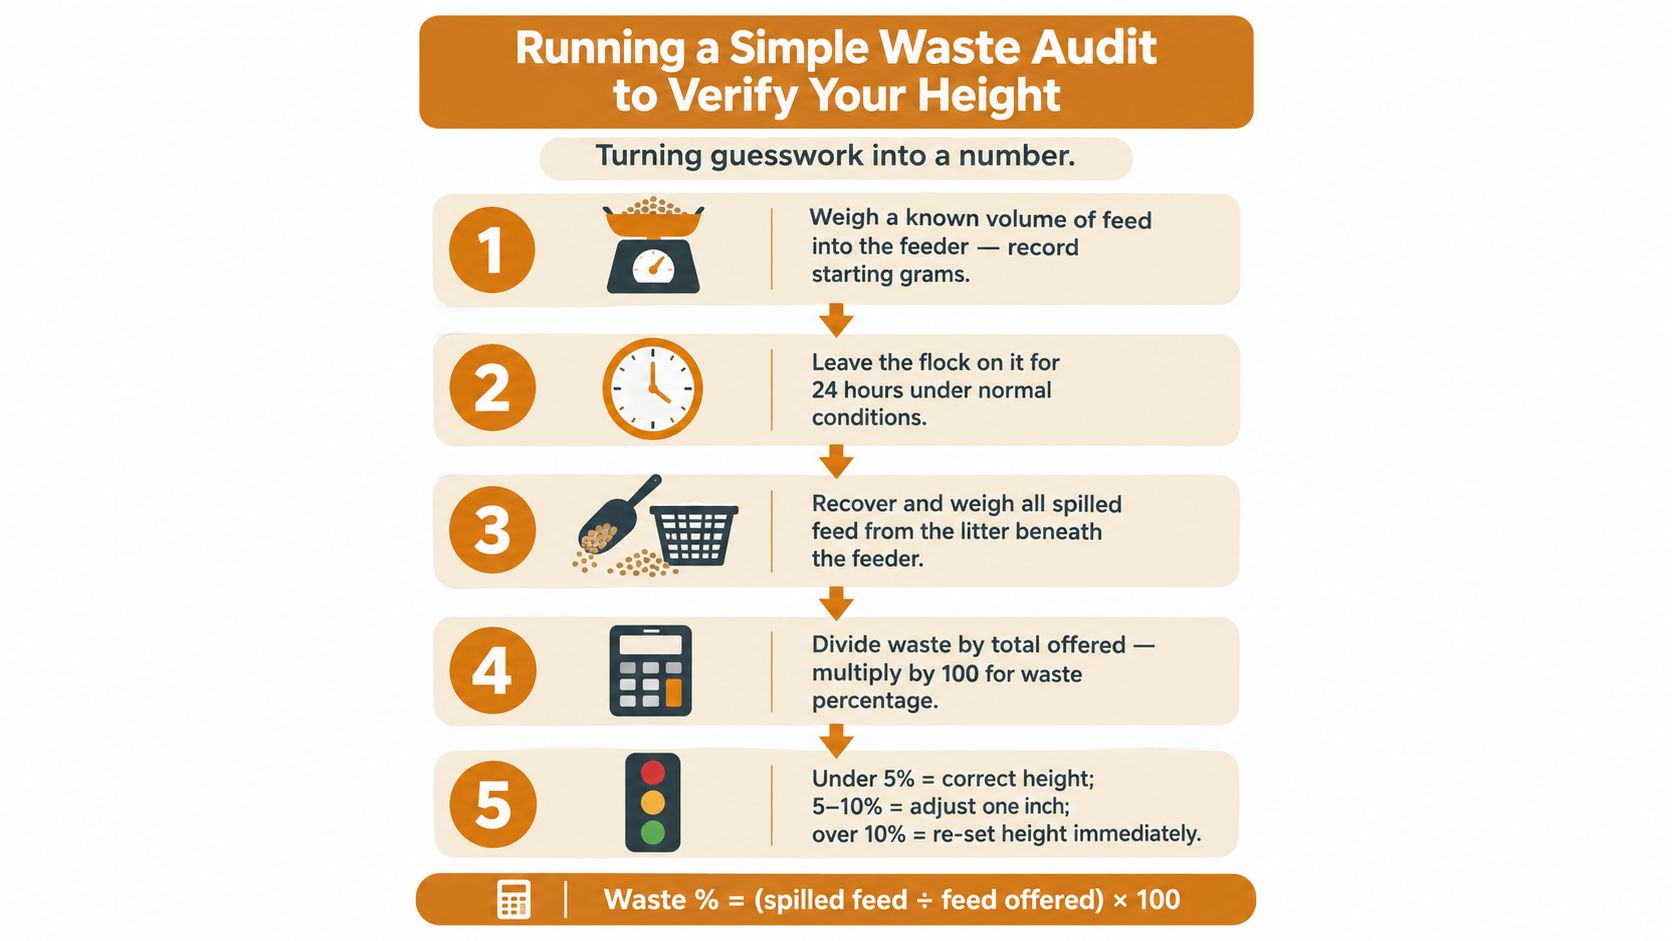
Begin with the same feeder, the same feed, and ordinary flock conditions. Weigh the feed loaded into the container, record the bird count, and leave the feeder in use for a fixed 24-hour period, as recommended by the audit method described in the published feed-loss experiment. Collect spilled feed from beneath and around the feeder, separate it from litter as carefully as possible, and weigh it.
Calculate:
Waste percentage = spilled feed ÷ feed offered × 100
Change only the feeder height between the first and second conditions. The verified method recommends small adjustments and repeating each condition for at least three comparable days, so a windy day or an unusual feeding pattern doesn't decide the result. Record feed type, weather, litter condition, bird numbers, and any change in flock behavior.
Read the mess, not just the scale
Dry feed scattered across clean litter suggests flicking, a low rim, unstable suspension, or an opening that gives birds too much sideways access. Damp, dark, or manure-touched feed is a separate contamination signal. A feeder can show little total spillage and still be unsuitable if the feed that remains is dirty.
Keep these variables steady where possible:
- Feed texture: Don't compare a crumble period with a whole-grain period and blame the height.
- Flock composition: A new pullet, bantam, or dominant hen can change access and feeding behavior.
- Weather: Wind and rain can move spilled feed or introduce moisture independently of feeder position.
- Litter: Fresh, deep bedding changes both the feeder's effective height and the meaning of recovered material.
The geese study summarized in the same research source found the lowest feed loss when the trough was approximately at beak height, with differences among treatments statistically significant at P < 0.01, while growth performance wasn't adversely affected. That result shouldn't be transferred directly to chicken hens. Its practical value is the method: height and waste don't always move in a straight line, so a modest adjustment can outperform both a very low and a very high setting.
Don't promise yourself a particular reduction before measuring. Use grams of waste per bird per day as the comparison, then keep the setting that reduces waste without making the smallest bird stretch or wait.
Feeder Height for Treats Like Dried Grubs
Treats don't behave like a complete ration. Dried grubs, scratch, and other lightweight foods can scatter from a shallow dish, especially when several birds peck at once. A low open bowl also puts the treat directly in the path of litter, manure, and rodents.
A raised treat station gives you more control. Use a stable dish on a broad block, a secured hanging container, or a covered tray that doesn't tip when a hen leans against it. Set the usable edge where the smallest bird can reach comfortably, but don't place the station so high that a young pullet has to climb or jump.
The dedicated station matters because mixing treats into the main feeder changes the behavior you're trying to manage. Birds may sift through the complete ration to find the preferred pieces, then flick the rejected material onto the floor. That turns a carefully adjusted ration feeder into an open sorting tray.
Keep treats separate from the ration
Serve the treat after birds have had access to their ordinary feed, rather than using it to replace the main ration. Offer an amount the flock can finish promptly, and remove leftovers before evening so scattered food doesn't become an invitation to pests. The exact portion depends on flock size and the role of the treat, so watch whether birds leave material behind.
The dried grubs guide from Pure Grubs is relevant here because dried larvae are a supplemental food, not a reason to abandon the main feeder's height or containment. A stable dish also makes training easier. Birds can learn to approach one predictable station without crowding the ration feeder.
Pure Grubs' catalog describes its black soldier fly larvae as USA-grown and dried, with 36–42% crude protein and 30–40% healthy fats, and states that the product contains no additives or preservatives. Those facts describe the product, not a feeding quantity. Use any dried treat as a controlled supplement, keep the station clean, and judge the setup by access and leftover scatter.
The best treat station complements a properly tuned feeder. It shouldn't sit on the floor because treats are temporary, and it shouldn't be hung at ration-feeder height without checking how the smallest bird reaches it.
Troubleshooting and a Coop-Side Checklist
Most height problems leave a recognizable pattern. Use the symptom to identify the likely mismatch, then make the smallest correction that addresses it.
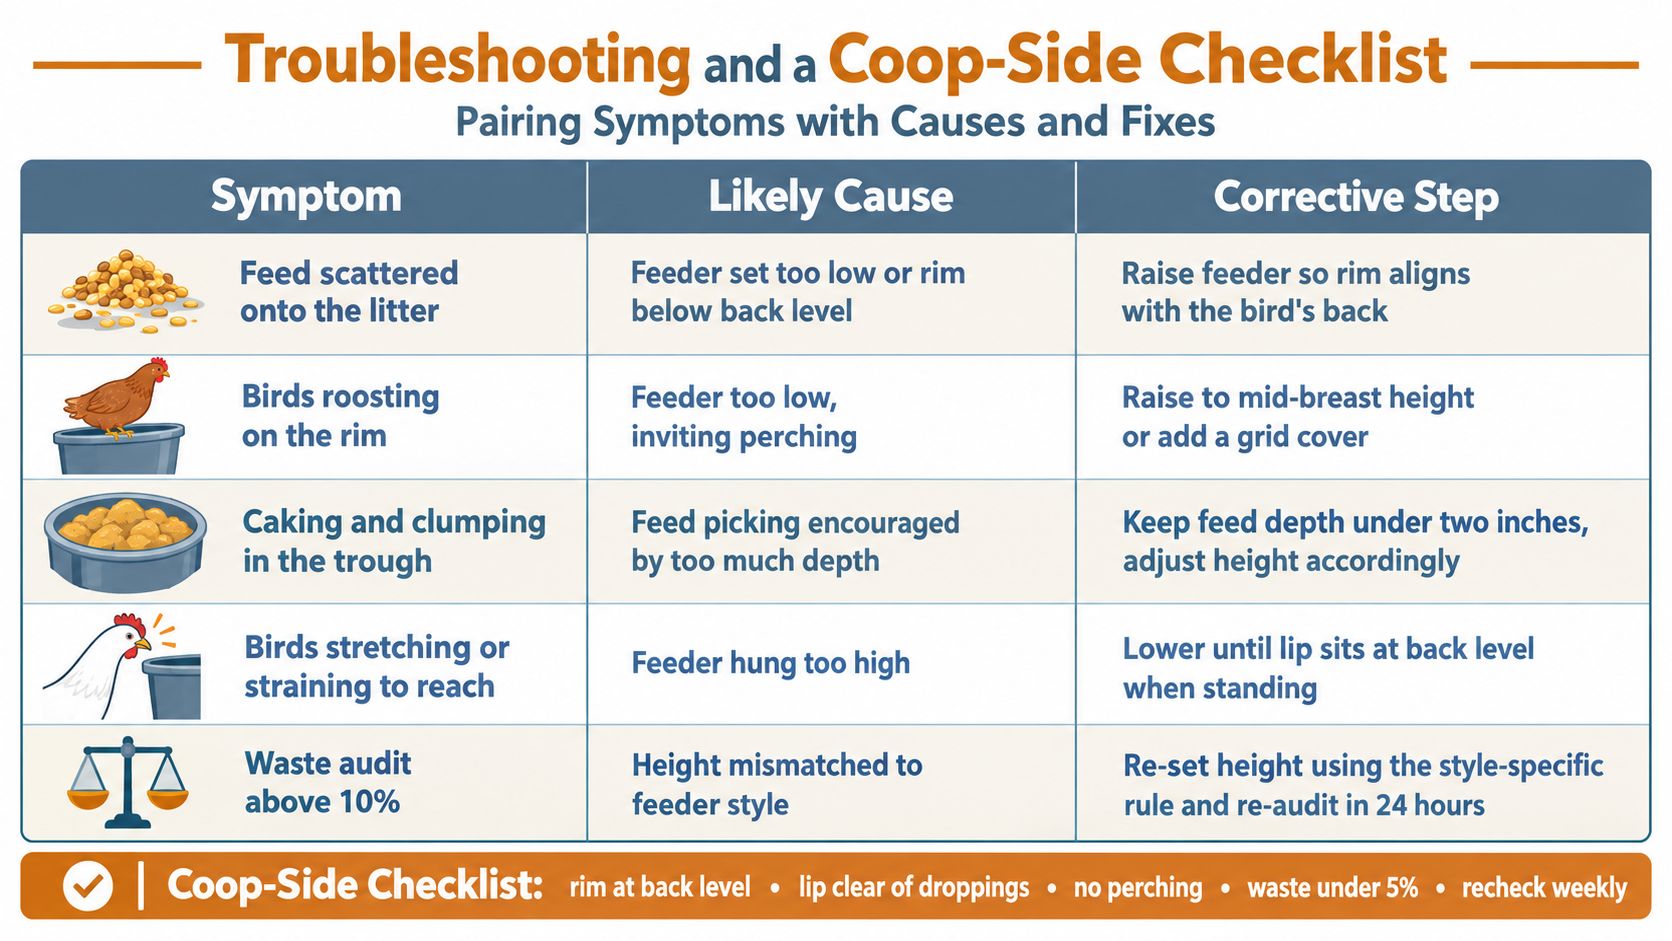
| Symptom | Likely Cause | Corrective Step |
|---|---|---|
| Feed scattered onto litter | Feeder is too low, unstable, or below back level | Raise or stabilize it, then observe the smallest bird |
| Birds jumping into the trough | The container is too accessible from the floor | Add a secure support and use a rim that discourages entry |
| Dominant hens block access | Too little feeder space or one feeding point | Add space or place a second feeder away from the first |
| Wet mash in a pan | Moisture is reaching the feed or the pan sits in damp bedding | Move it to a dry position and clean contaminated feed |
| Birds stretching or straining | Feeder is too high for the smallest birds | Lower the working lip until natural standing access returns |
| Feed beneath droppings boards | Feeder is too close to a contamination source | Relocate it and keep the feed surface away from falling manure |
| Dried treats scattered | Open dish is too light, low, or crowded | Use a stable raised treat station and remove leftovers |
The coop-door check
Run this quick inspection regularly:
- Measure two representative birds. Include the smallest bird and one typical adult or grower.
- Check the working edge. The feed surface or lip should be approximately level with the access bird's back.
- Inspect the support. A hanging feeder should stay level, and a pan should not rock or sink into litter.
- Look at the feed. Remove damp or visibly contaminated material rather than stirring it back into the clean ration.
- Sweep and weigh spillage. Use the same audit method when a height change is meant to improve efficiency.
- Check feeder space. Height won't fix a queue caused by insufficient access.
- Keep treats separate. Dried grubs and other supplements belong in a controlled station, not scattered through the ration.
- Recheck after flock changes. New birds, breed differences, growth, and added litter can all change the correct setting.
Pullets need height changes as their backs rise. A sick or injured bird may temporarily need easier access, even if that means using a separate low feeder rather than lowering the main feeder for the entire flock. The final test remains practical: the smallest bird eats without strain, taller birds don't rake the ration out, and the waste audit confirms that the setting works in your actual coop.
Pure Grubs offers USA-grown dried Black Soldier Fly Larvae as a calcium and protein-rich supplemental treat for chickens and other birds, with the catalog listing 36–42% crude protein and no additives or preservatives. Visit Pure Grubs to choose a separate, stable treat option that complements your height-tuned ration feeder.