

How to Build a Chicken Coop with Run for 10 Chickens
You've ordered the charming prefab coop, assembled it in the yard, and then watched ten hens turn the inside into a traffic jam. By summer, the nest boxes are crowded, the bedding stays damp, and the run looks less like a garden feature and more like a bare patch of mud.
A successful chicken coop with run for 10 chickens starts with space, but it doesn't end there. The layout, ventilation, mesh, latches, drainage, and daily access all work as one system. Get one weak point wrong, and a coop that looks solid can still become stressful for the flock or vulnerable to predators.
Why Getting Your Coop and Run Size Right Matters
The first mistake many new keepers make is trusting the bird count printed on a prefab coop's packaging. “Holds ten chickens” often describes a temporary sales figure rather than a comfortable, workable home. Ten hens need room to move away from one another, reach feed and water without a confrontation, and occupy the run without turning every sunny day into a contest over space.
Crowding changes the character of a flock. Hens that can't get away from a dominant bird may become tense, start pecking, or fight more often. A run that's too small also wears down quickly. Once the ground becomes bare and wet, the birds have fewer places to scratch, dust-bathe, or occupy themselves.
Practical rule: Size the enclosure for the way your hens will actually live, not for the ideal routine you hope to provide.
Start by marking the proposed footprint in the yard with stakes or string. That simple step exposes problems early, including a gate that won't open fully, a run that blocks maintenance access, or a coop positioned where rainwater collects. It's much easier to move string than to move a framed building.
This guide uses a practical target for ten standard hens, then deals with the details that usually decide whether the build lasts. You'll find real coop and run footprints, a materials plan, a layout that keeps cleaning manageable, and a layered predator barrier that protects more than just the visible walls.
How Much Space 10 Chickens Really Need
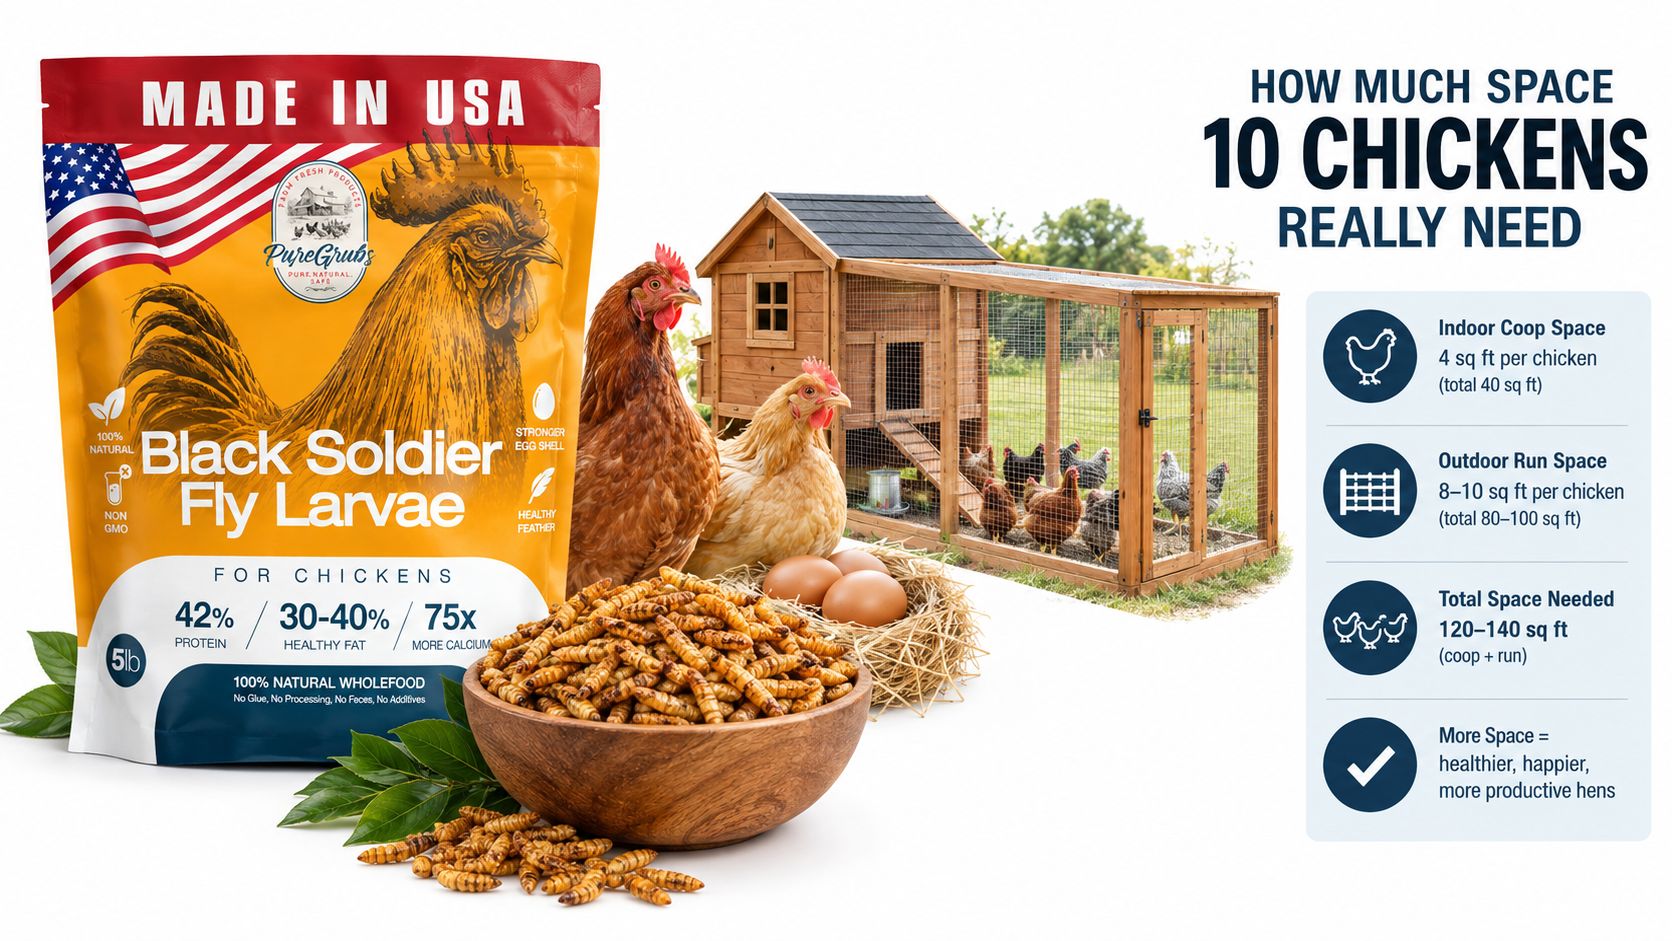
For ten standard chickens with regular daytime access to an outdoor run, plan on about 30 to 40 square feet of indoor coop space and roughly 80 to 100 square feet of run space. That reflects the commonly used allowance of 3 to 4 square feet inside and 8 to 10 square feet outside per bird, as summarized in backyard chicken coop sizing guidance.
A practical footprint is a coop measuring 5 by 8 feet or 6 by 7 feet, attached to a run measuring 10 by 10 feet. Those footprints give you a clear starting point for marking the site, though the better choice depends on whether the hens spend most of the day outside, whether the run can be moved, and how much room you have for maintenance.
Comparing the main space standards
Different guidance sources use slightly different outdoor allowances. Oregon State University Extension has recommended at least 3 square feet per bird indoors when chickens have outdoor access. University of Florida IFAS guidance describes 8 to 10 square feet per bird for the run and at least 3 square feet per bird in enclosed housing. Cornell Cooperative Extension uses an indoor range of 2.5 to 3.5 square feet and an outdoor range of 4 to 5 square feet, while the RSPCA frames enclosure space using metric requirements for groups of bantams or large birds. These recommendations are discussed together in Oregon State University's backyard chicken coop design guidance.
| Source | Coop Space Per Bird | Run Space Per Bird | Total for 10 Birds |
|---|---|---|---|
| Common planning benchmark | 3 to 4 sq ft | 8 to 10 sq ft | 30 to 40 sq ft coop, 80 to 100 sq ft run |
| Oregon State University Extension | At least 3 sq ft with outdoor access | Outdoor access assumed | At least 30 sq ft indoors |
| University of Florida IFAS | At least 3 sq ft | 8 to 10 sq ft | At least 30 sq ft coop, 80 to 100 sq ft run |
| Cornell Cooperative Extension | 2.5 to 3.5 sq ft | 4 to 5 sq ft | 25 to 35 sq ft coop, 40 to 50 sq ft run |
These differences exist because the recommendations make different assumptions about daytime access, breed, climate, and whether the birds are fully confined. A minimum indoor allowance works only when the run is usable. If bad weather, muddy ground, or neighborhood restrictions keep the flock indoors, the coop needs to function as more than a sleeping box.
For planning purposes, I'd mark out 5 by 8 feet indoors and 10 by 10 feet outdoors as the compact workable arrangement. Choose the larger end of the indoor range if the hens are frequently confined, and make the run larger if expanding the flock is possible. The run is where chickens spend most of their waking hours, so extra outdoor space usually improves the daily experience more than decorative features on the coop.
A small supplementary treat can also help with handling and flock management. USA GROWN BLACK SOLDIER FLY LARVAE FOR CHICKENS is described in the catalog as a dried insect feed containing 36 to 42% crude protein, 30 to 40% healthy fats, and 75 times more calcium than mealworms. Treats don't replace a balanced ration, but a flock-friendly reward can make it easier to call hens into the run or inspect them.
Designing the Coop Layout for a 10-Hen Flock
A workable coop layout should let hens move from the pop door to the roosts without crossing the feeder, crowding through a narrow passage, or fouling the nest boxes. The human layout matters just as much. You should be able to open the cleaning door, carry bedding and tools inside, and reach every corner without climbing through the run.
Place roosts higher than the nest boxes because hens usually choose the highest suitable sleeping point. Set them above a droppings board or another removable collection surface, never above the nests. Otherwise, overnight droppings land where eggs are laid, and cleaning becomes a daily nuisance.
Put service points where you will use them
Give the nest boxes a quiet wall away from the pop door and the busiest foot traffic. They do not need to take up much floor space, but the human access door should reach them directly. If collecting eggs or replacing soiled bedding requires crouching, stretching, or moving equipment first, routine maintenance will eventually get skipped.
A pop door should open directly into the run, with no sharp corner or bottleneck immediately outside it. Leave the route clear of feeders and waterers so hens can exit without pushing through a crowd. Inspect the latch from the outside, and make sure you can reach and replace it without dismantling the wall. A single weak latch can defeat otherwise sound construction.
Keep the main service door wide enough for a rake, bucket, and fresh bedding. Before choosing the final footprint, compare practical arrangements in these chicken coop designs. Choose the layout you can clean, inspect, and repair without improvising.
Ventilation belongs above the birds
Ventilation removes moisture and stale air, but openings must not direct cold air across sleeping hens. Place vents high near the roofline, above roost height, and cover every opening with predator-resistant mesh. Add adjustable covers where wind-driven rain or severe weather can reach the vents.
Do not depend on one small window for air exchange. A coop can feel warm while damp air remains trapped inside, especially after ten hens spend the night together. High openings on opposing walls can encourage air movement while keeping the roost out of a draft path. An unprotected vent is another single weak point, allowing predators inside or letting weather damage the interior.
Before sheathing the walls, stand inside the unfinished frame and inspect it from a hen's perspective. Confirm that the roost is not beneath a vent, the nest boxes are not under a roost, and the cleaning door reaches the areas where bedding and droppings will collect. Correcting those relationships at this stage is far easier than rebuilding them later.
Planning the Run Size and Layout
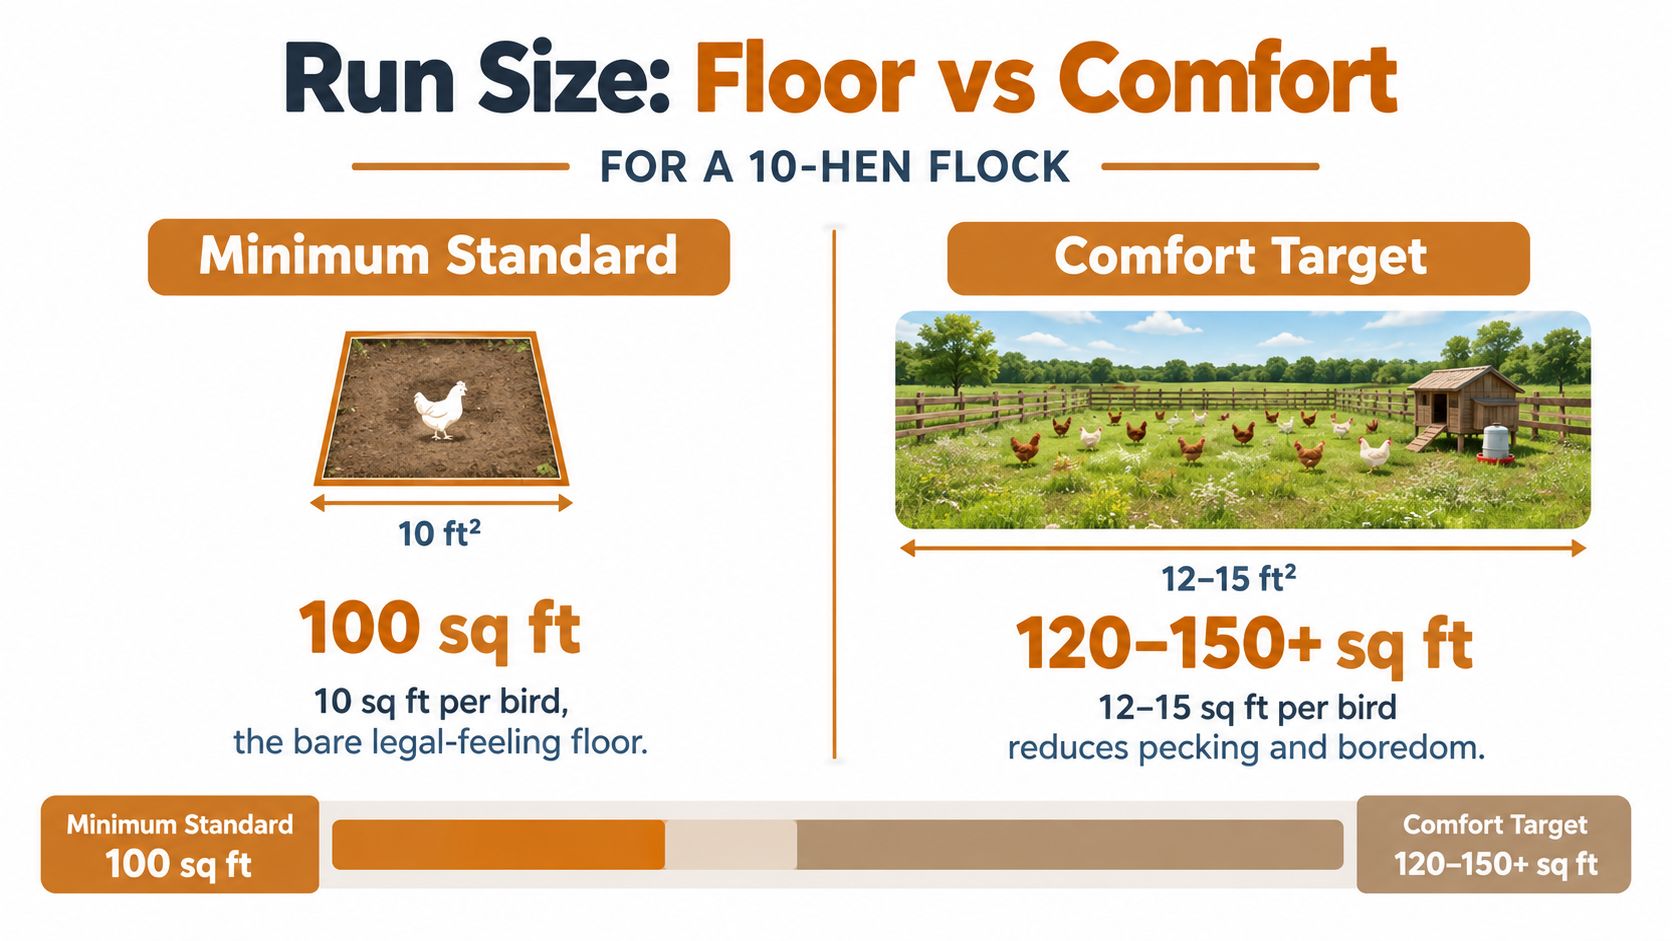
The familiar 100-square-foot run for ten hens is a floor, not a comfort target. Common guidance places outdoor space at 8 to 10 square feet per bird, while some buyer's guides recommend 15 to 20 square feet per chicken when daily free-ranging isn't possible, as explained in this comparison of chicken space requirements.
Choose the footprint around your routine
A 10 by 10 foot run is a sensible minimum planning shape for ten standard hens that regularly use the yard or another outdoor area. If the run is their only daytime environment, make it more generous where the yard allows. Extra room gives the flock more opportunities to spread out, and it slows the familiar cycle of scratching away every plant and turning the surface into mud.
Breed size matters, as does temperament. Active birds need more usable space than quiet birds, and a fixed run needs more careful management than a movable one. A movable run can give hens fresh ground, but it requires a reliable daily routine and still needs secure mesh, a covered top, and a safe connection to the coop.
Build the run wide enough for a person to enter with tools and carry out a proper inspection. A narrow tunnel may save ground space, but it makes winter bedding, mesh repairs, and health checks frustrating. Add shade, a dry dust-bathing area, and objects that break up the line of sight so a lower-ranking hen can move away from a dominant bird.
Leave room to expand if your fence line permits it. Expansion is easier when the original run has a straight side, accessible posts, and a door that can be reused rather than buried inside a new frame.
A covered top protects the flock from overhead threats and helps keep rain from turning the run into a wet enclosure. For material and placement ideas, this guide to bird netting over a chicken run is a useful planning reference.
The most honest choice is the footprint you can keep dry, shaded, clean, and secure. A larger run that becomes inaccessible or impossible to maintain won't serve the birds as well as a slightly smaller enclosure that receives regular attention.
Choosing Materials That Hold Up
Put the strongest materials at the perimeter and the openings. A basic framed coop can use ordinary structural lumber, exterior-grade wall sheathing, and a roof that sheds water beyond the wall line. The finish doesn't need to be elaborate, but the structure must stay rigid when doors move and when predators push against the mesh.
Chicken wire is useful for containing chickens, but it isn't a dependable predator barrier. Use 1/2-inch hardware cloth on the run walls and over vents, windows, and other openings. Choose a mesh that's difficult to bend away from its fasteners, then secure it with sturdy staples, screws with washers, or a framed sandwich that prevents animals from pulling at an exposed edge.
Spend money where failure hurts
Roofing deserves more attention than decorative siding. A watertight roof protects bedding, preserves the frame, and gives the flock a dry refuge during bad weather. Extend the roof beyond the run walls where possible, and make sure the run still has shaded areas when the sun is high.
Latches are another place where cheap parts create expensive problems. A door can be made from simple framing, but it needs hinges that won't sag and a closure that stays shut when a determined animal pushes, claws, or manipulates it. Protect the mesh edges around doors because that moving joint is often weaker than a fixed wall.
Save on appearance before you save on security. Paint color and interior trim are optional. Strong mesh, sound roofing, and reliable door hardware are not.
A weekend builder can combine a prefab coop box with a custom run, or reuse a purchased door and frame the rest from lumber. That approach works when the factory components are treated as parts, not as proof that the finished enclosure is predator-proof. Measure the actual openings and reinforce the transition between the prefab wall and your run.
For a closer look at welded fencing options and construction considerations, consult this buyer's guide from XTREME EDEALS INC.. Use any guide as a way to compare mesh construction, then inspect the finished product for sharp edges, weak joins, and gaps at ground level.
Predator-Proofing Your Coop and Run
Predator protection works as a layered system. The wall mesh matters, but so do the vents, door corners, roof, perimeter, and latch. A single unprotected opening can defeat an otherwise careful build, especially when a predator can reach through it or widen it over time.
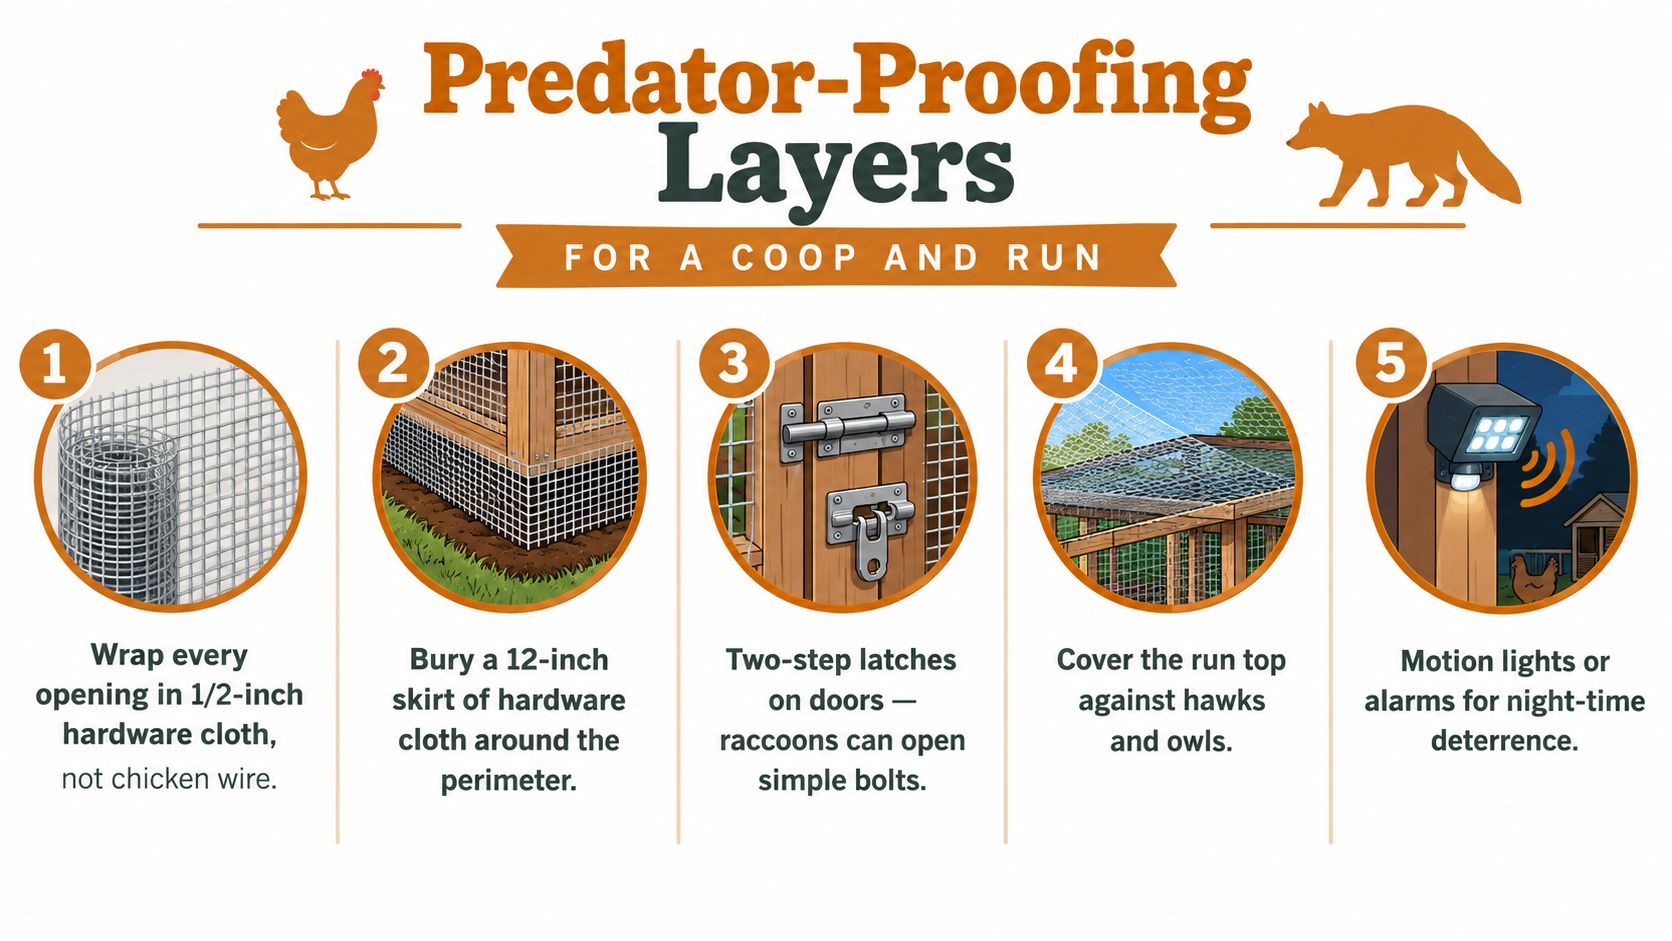
Cover every opening with 1/2-inch hardware cloth, including windows, ventilation openings, the pop door area, and the upper run. Chicken wire can keep hens inside, but it isn't the barrier to rely on against predators. Fold or frame the mesh so its edges can't be peeled away from the structure.
Close the route below and above
Digging predators don't need to defeat the wall if they can pass underneath it. Bury the perimeter fencing at least 12 inches or extend it outward as an apron, using hardware cloth to create a barrier that meets the ground beyond the wall line. This construction approach is covered in technical chicken coop build guidance.
Inspect every corner where the run meets the coop. Look for gaps at the base, places where the mesh stops short of a post, and sections where the ground has eroded after rain. Walk the perimeter from the outside and push against the mesh. Movement often reveals a weak fastening point before an animal does.
The top needs protection too. A covered run helps deter hawks and owls, while a solid roof section offers shade and a dry place for the flock. Overhead protection also reduces the chance that a frightened bird will panic and collide with exposed framing.
Treat latches as a separate security layer
A single simple bolt is a poor choice for a pop door or human door. Use a two-step closure that an animal can't easily manipulate, and check that the door sits flush against its frame. Raccoons are capable of exploiting loose or uncomplicated hardware, so a latch that feels secure to a person may still be a weak point.
A practical security audit asks five questions:
- Mesh: Is every opening covered with the same predator-resistant mesh?
- Ground: Does the perimeter include a buried barrier or outward apron?
- Joints: Can anything push through a corner, hinge side, or roof seam?
- Doors: Do the pop door and service door close tightly and use layered hardware?
- Night access: Can the flock be secured before predators become active?
If you're considering a chain-link structure or adapting a kennel-style frame, this FenceScape chain link build offers useful construction context. The finished enclosure still needs suitable mesh, protected openings, and a secure ground connection for chickens.
Feeder and Waterer Placement Plus Ongoing Maintenance
Keep feeders and waterers in the run, away from the roosting zone. Droppings fall while hens sleep, and placing food or water beneath the roost invites contamination and creates a wet, dirty patch that spreads through bedding and feet.
Raise both containers enough to reduce scratching and bedding being kicked inside, while keeping them comfortable for the birds to reach. The exact height depends on the container and flock, but the test is simple: hens should eat and drink without stretching awkwardly, and the container shouldn't sit where they can easily shovel litter into it.
Place the feeding station near the human access door, but not in the doorway. Refilling should be quick in bad weather, and you should be able to remove the container without walking through the entire run. Keep water on a stable surface where spilled moisture can drain instead of soaking the ground.
Use a maintenance rhythm
A well-built coop still needs routine attention. Divide the work into small checks rather than waiting for a major failure.
- Daily: Check that water is clean, the doors are closed correctly, and the flock is moving normally.
- Weekly: Clear the droppings board, remove wet bedding, inspect the run surface, and look for new holes or disturbed soil.
- Seasonally: Deep-clean the interior, refresh bedding, examine the roof and drainage, and test every latch and mesh fastening.
- After severe weather: Check the apron, roof edges, vents, and run joints for movement or washout.
The chicken coop maintenance guide can help turn those jobs into a repeatable routine. I also like using dried grubs as a training treat. Shake the bag near the run and the hens come running, which makes it easier to bring them into one area for a count, a quick health check, or a door inspection.
The best coop is the one that stays usable after the novelty wears off. Give yourself clear access, keep food and water away from droppings, and inspect the security layers before small defects become openings.
Pure Grubs offers USA-grown, dried Black Soldier Fly Larvae as a supplemental treat for chickens and other birds, with catalog-listed protein, calcium, and fat content. If you want a simple reward for calling hens into a secure run or making routine checks easier, visit Pure Grubs and choose a feed option that fits your flock.